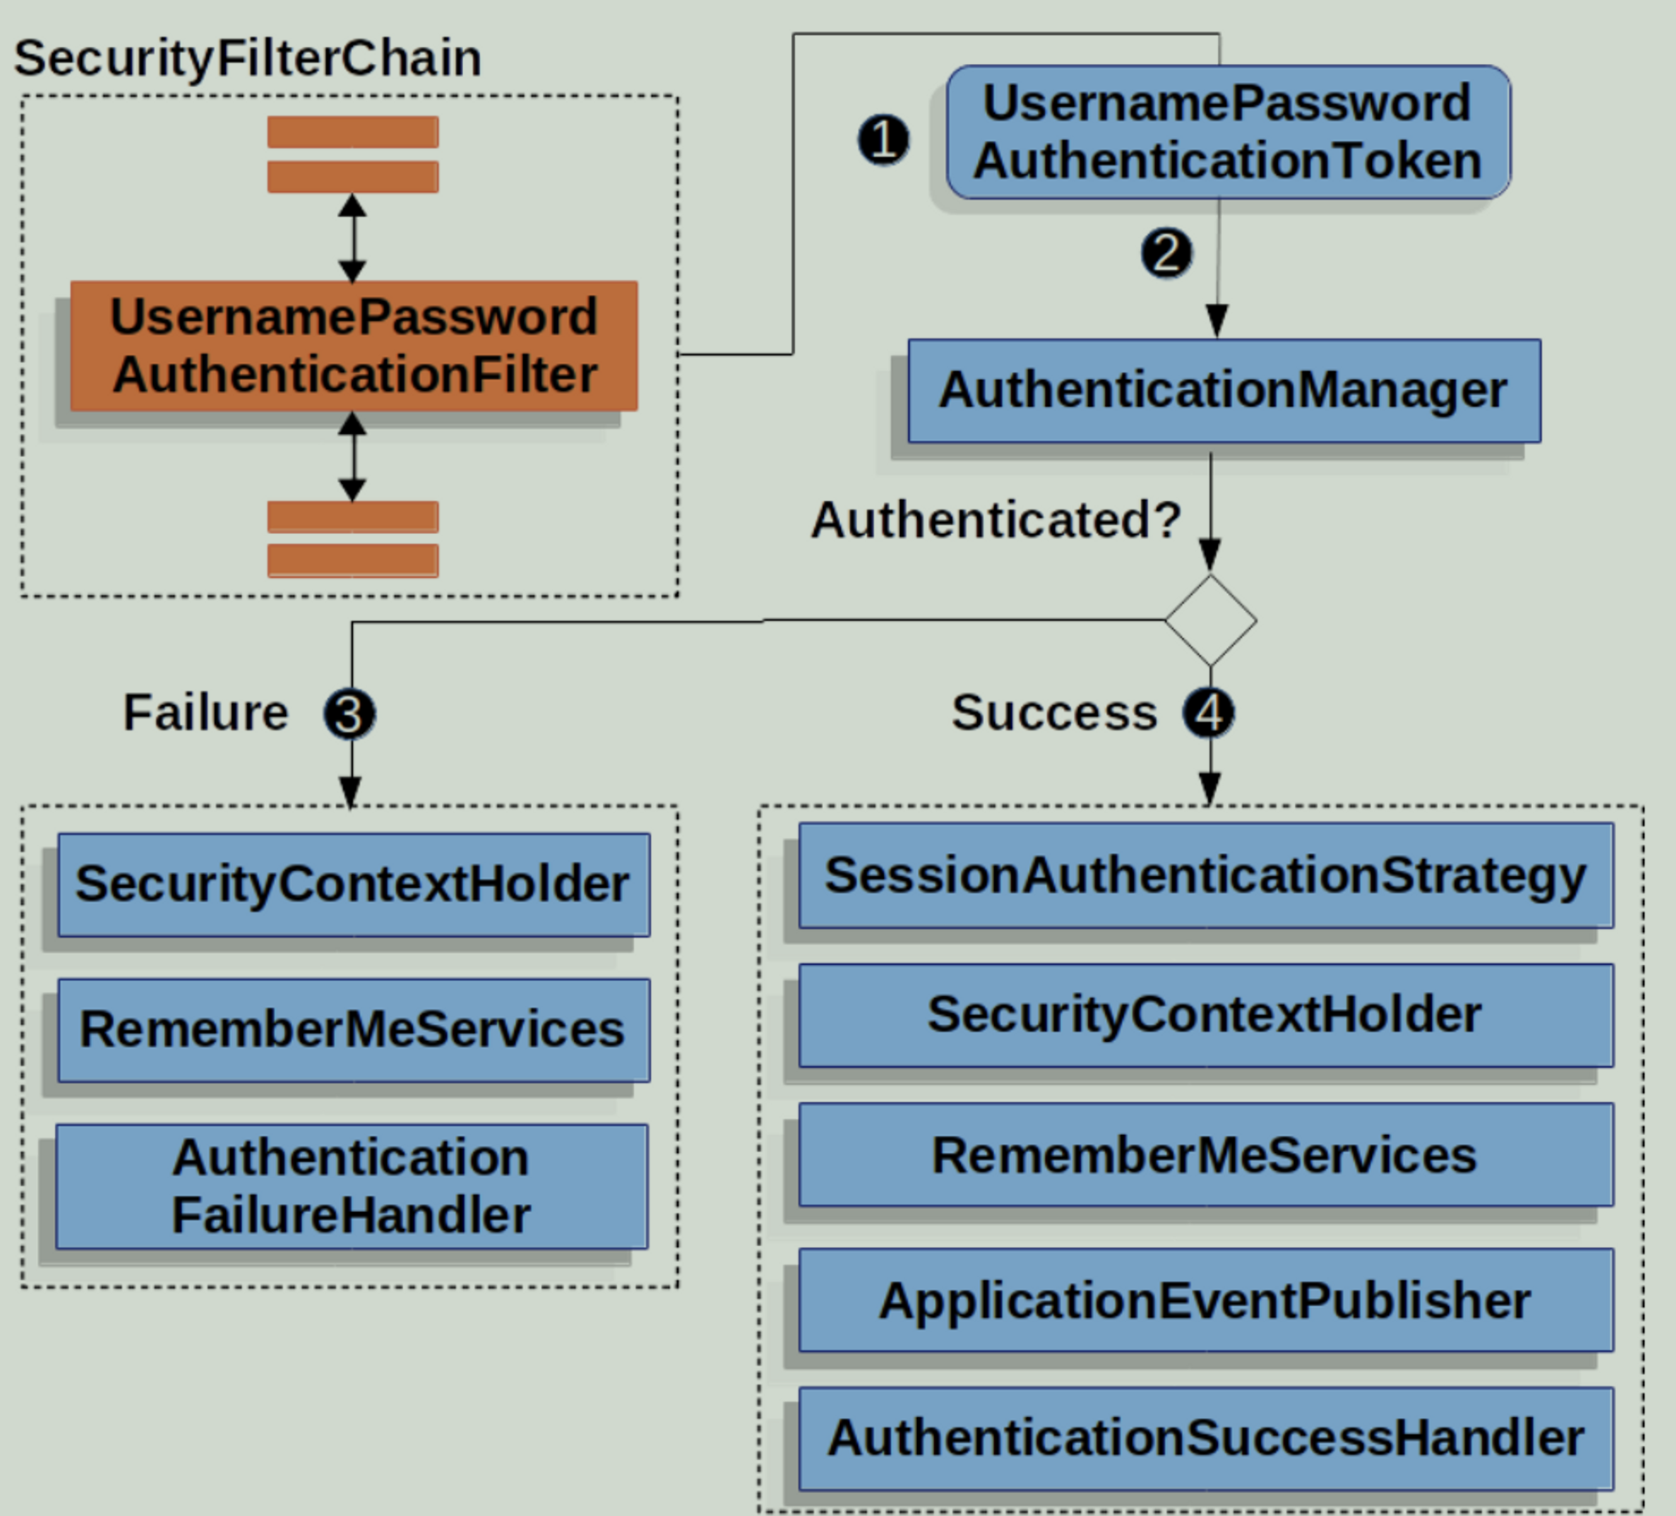
UsernamePasswordAuthenticationFilter란 폼 기반 인증 (form based authentication)방식으로 인증을 진행할 때 아이디, 패스워드 데이터를 파싱하여 인증 요청을 위임하는 필터이다.
- POST /login 을 처리. processingUrl 을 변경하면 주소를 바꿀 수 있음.
- form 인증을 처리해주는 필터로 스프링 시큐리티에서 가장 일반적으로 쓰임.
유저가 로그인 창에서 Login을 시도할 때 보내지는 요청에서 아이디(username)와 패스워드(password) 데이터를 가져온 후 인증을 위한 토큰을 생성 후 인증을 다른 쪽에 위임하는 역할을 하는 필터이다.
- AuthenticationManager에게 인증을 위임한다.
Spring Boot 기반의 HttpSecurity를 설정하는 코드에서 http.formLogin(); 을 사용하면 시큐리티에서는 기본적으로 UsernamePasswordAuthenticationFilter 을 사용하게 된다.
@Bean
public SecurityFilterChain configure(HttpSecurity http) throws Exception {
    http.formLogin();
}
AuthenticationManager에게 인증을 위임하여 인증하고, 사용자 인증을 위한 정보(credentials)를 취합하고, Authentication 객체를 생성한다.
- UsernamePasswordAuthenticationFilter 구현에서는 로그인 아이디/비밀번호를 취합하고, Authentication 인터페이스 구현체중 하나인 UsernamePasswordAuthenticationToken 객체를 생성함
그리고 인증에 성공하여 생성된 Authentication 객체는 successfulAuthentication() 메서드를 호출하여 SecurityContextHolder에 저장한다.
AbstractAuthenticationProcessingFilter 상속받아 구현되어 있다.
public class UsernamePasswordAuthenticationFilter extends AbstractAuthenticationProcessingFilterAbstractAuthenticationProcessingFilter의 doFilter() 부터 따라가보자
@Override
public void doFilter(ServletRequest request, ServletResponse response, FilterChain chain)
            throws IOException, ServletException {
        doFilter((HttpServletRequest) request, (HttpServletResponse) response, chain);
}

private void doFilter(HttpServletRequest request, HttpServletResponse response, FilterChain chain)
            throws IOException, ServletException {
        if (!requiresAuthentication(request, response)) {
            chain.doFilter(request, response);
            return;
        }
        try {
            Authentication authenticationResult = attemptAuthentication(request, response);
            if (authenticationResult == null) {
                // return immediately as subclass has indicated that it hasn't completed
                return;
            }
            this.sessionStrategy.onAuthentication(authenticationResult, request, response);
            // Authentication success
            if (this.continueChainBeforeSuccessfulAuthentication) {
                chain.doFilter(request, response);
            }
            successfulAuthentication(request, response, chain, authenticationResult);
        }
        catch (InternalAuthenticationServiceException failed) {
            this.logger.error("An internal error occurred while trying to authenticate the user.", failed);
            unsuccessfulAuthentication(request, response, failed);
        }
        catch (AuthenticationException ex) {
            // Authentication failed
            unsuccessfulAuthentication(request, response, ex);
        }
}
1. requiresAuthentication() 을 호출하여 현재 요청에 대한 로그인 요청을 처리해야 하는지 여부를 나타낸다.
- filterProcessesUrl 속성과 일치시키기 전에 요청 URL의 "path"에서 모든 매개변수(예: https:hostmyappindex.html;jsessionid=blah의 jsessionid 매개변수)를 제거한다
- 로그인 요청이 아니라면, 다음 필터로 넘어간다
protected boolean requiresAuthentication(HttpServletRequest request, HttpServletResponse response) {
        if (this.requiresAuthenticationRequestMatcher.matches(request)) {
            return true;
        }
        if (this.logger.isTraceEnabled()) {
            this.logger
                    .trace(LogMessage.format("Did not match request to %s", this.requiresAuthenticationRequestMatcher));
        }
        return false;
}
2. attemptAuthentication()을 통해 실제 인증을 수행한다. 이 인증은 UsernamePasswordAuthenticationFilter에서 진행한다.
// UsernamePasswordAuthenticationFilter 클래스
@Override
public Authentication attemptAuthentication(HttpServletRequest request, HttpServletResponse response) throws AuthenticationException {
    if (this.postOnly && !request.getMethod().equals("POST")) {
        throw new AuthenticationServiceException("Authentication method not supported: " + request.getMethod());
    }
    String username = obtainUsername(request);
    username = (username != null) ? username : "";
    username = username.trim();
    String password = obtainPassword(request);
    password = (password != null) ? password : "";
    UsernamePasswordAuthenticationToken authRequest = new UsernamePasswordAuthenticationToken(username, password);
    // Allow subclasses to set the "details" property
    setDetails(request, authRequest);
    return this.getAuthenticationManager().authenticate(authRequest);
}
- request안에서 username, password 파라미터를 가져와서 UsernamePasswordAuthenticationToken 을 생성 후 AuthenticationManager을 구현한 객체에 인증을 위임한다.
- 이 메소드에서 만들어진 authentication 객체(인증 객체)는 UsernamePasswordAuthenticationToken이며, 아직은 인증되지 않은 객체이다
- UsernamePasswordAuthenticationToken.unauthenticated(username, password)
- AuthenticationManager 인터페이스를 구현한 ProviderManager가 인증을 진행한다.
- 인증을 진행하고, 인증이 정상적으로 되었다면 새롭게 만들어진 인증된 Authentication 객체를 반환한다.
- 여기서 새롭게 만들어진 Authentication 객체는 인증이 완료된 상태이고, GrantedAuthority 목록을 포함하고 있음
- 인증이 되지 않았다면, 인증 예외 (401 AuthenticationException)을 발생한다.
3. 인증이 완료면 SecurityContextHolder에 인증 객체를 저장한다.
protected void successfulAuthentication(HttpServletRequest request, HttpServletResponse response, FilterChain chain,
            Authentication authResult) throws IOException, ServletException {
        SecurityContext context = SecurityContextHolder.createEmptyContext();
        context.setAuthentication(authResult);
        SecurityContextHolder.setContext(context);
        this.securityContextRepository.saveContext(context, request, response);
        if (this.logger.isDebugEnabled()) {
            this.logger.debug(LogMessage.format("Set SecurityContextHolder to %s", authResult));
        }
        this.rememberMeServices.loginSuccess(request, response, authResult);
        if (this.eventPublisher != null) {
            this.eventPublisher.publishEvent(new InteractiveAuthenticationSuccessEvent(authResult, this.getClass()));
        }
        this.successHandler.onAuthenticationSuccess(request, response, authResult);
}- RememberMeServices에 로그인 성공했다고 알린다.
- ApplicationEventPublisher를 통해 InteractiveAuthenticationSuccessEvent를 발생시킨다.
- 추가 동작을 AuthenticationSuccessHandler에 위임한다.
- 서브클래스는 성공적인 인증 후 FilterChain을 계속하기 위해 이 메서드를 재정의할 수 있다.
AuthenticationSuccessHandler은 SavedRequestAwareAuthenticationSuccessHandler클래스이며,
RequestCache에 저장되어있던, 다른 URL로 redirect 시킨다
public class SavedRequestAwareAuthenticationSuccessHandler extends SimpleUrlAuthenticationSuccessHandler {

    protected final Log logger = LogFactory.getLog(this.getClass());

    private RequestCache requestCache = new HttpSessionRequestCache();

    @Override
    public void onAuthenticationSuccess(HttpServletRequest request, HttpServletResponse response,
            Authentication authentication) throws ServletException, IOException {
        SavedRequest savedRequest = this.requestCache.getRequest(request, response);
        if (savedRequest == null) {
            super.onAuthenticationSuccess(request, response, authentication);
            return;
        }
        String targetUrlParameter = getTargetUrlParameter();
        if (isAlwaysUseDefaultTargetUrl()
                || (targetUrlParameter != null && StringUtils.hasText(request.getParameter(targetUrlParameter)))) {
            this.requestCache.removeRequest(request, response);
            super.onAuthenticationSuccess(request, response, authentication);
            return;
        }
        clearAuthenticationAttributes(request);
        // Use the DefaultSavedRequest URL
        String targetUrl = savedRequest.getRedirectUrl();
        getRedirectStrategy().sendRedirect(request, response, targetUrl);
    }

    public void setRequestCache(RequestCache requestCache) {
        this.requestCache = requestCache;
    }

}
4. 필터 체인을 마치고, 로그인 된 상태로 지정된 URL로 리다이렉트 한다.
그림으로 보는 폼 인증 과정

- 사용자가 form 인증으로 usernamer과 password를 제출하면 UserNamePasswordAuthenticationFilter는 HttpServletRequest에서 이 값을 주출해서 Authentication 인증 객체 구현체 중 하나인 UsernamePasswordAuthenticationToken을 만든다 (아직은 인증되지 않음)
- UsernamePasswordAuthenticationToken을 AuthenticationManager에게 전달하여 인증한다(ProviderManager)
- 인증에 실패하면
- SecurityContextHolder를 비운다
- RememberMeService.loginFail을 실행. rememberMe를 설정하지 않았따면 아무 동작도 하지 않는다
- AuthenticationFailureHandler를 실행한다
- 인증에 성공하면
- SessionAuthenticationStretegy에 새로 로그인 했음을 알린다
SecurityContextHolder에 Authentication을 넣는다- RememberMeServices.loginSuccess를 실행한다. rememberMe를 설정하지 않았따면 아무 동작도 하지 않는다
- ApplicationEventPublisher는 InteractiveAuthenticationSuccessEvent를 발생시킨다
- AuthenticationSuccessHandler를 실행하여 리다이렉트 한다. 보통 로그인 페이지로 리다이렉트 할때는 SimpelUrlAuthenticationHandler가 ExceptionTranslationFilter에 저장된 요청으로 리다이렉트 한다.

참조
- 인프런 정수원님 시큐리티 강의
- 인프런 백기선님 시큐리티 강의
- https://godekdls.github.io/Spring%20Security/authentication/#1010-usernamepassword-authentication
'Spring > Spring Security' 카테고리의 다른 글
| Remember-ME 인증과정 (0) | 2022.12.18 |
|---|---|
| BasicAuthenticationFilter (0) | 2022.12.18 |
| DefaultLogoutPageGeneratingFilter, LogOutFilter (0) | 2022.12.17 |
| DefaultLoginPageGeneratingFilter (0) | 2022.12.17 |
| Spring Security에서 인증이 일어나는 과정 (인증과정, form login 과정) (0) | 2022.12.17 |
