Spring/RestDocs
Restdocs fieldWithPath depth(list, array, 배열 문서화)
ysk(0soo)
2023. 1. 31. 00:50
RestDocs를 사용하여 필드를 문서화 때, 배열 depth가 길어지면 문서화하기 힘들어지는 경향이 있어 경험을 적어보려고 한다
라는 좋은 사이트를 사용하면 depth를 헷갈리지 않게 보기 좋다. (사랑해요 고마워요 스펜서)
- https://jsonformatter.org/ : json 이쁘게 보는 사이트
예제 1 - 2depth
다음과 같은 depth의 response를 작성해야 한다면
{
  "data": [
    {
      "orderId": "20230130233846616HKuINK",
      "storeId": "store1",
      "orderStatus": "PAYMENT_COMPLETE",
      "nickname": "이디야화이팅",
      "items": [
        [
          {
            "itemName": "아이스 아메리카노",
            "quantity": 1,
            "espressoShotCount": 1,
            "espressoType": "DECAFFEINATED",
            "cupSize": "VENTI",
            "cupType": "PERSONAL"
          }
        ],
        [
          {
            "itemName": "카페 라떼",
            "quantity": 2,
            "espressoShotCount": 1,
            "espressoType": "DECAFFEINATED",
            "cupSize": "VENTI",
            "cupType": "PERSONAL"
          }
        ]
      ]
    },
    {
      "orderId": "20230130233846586HKDdfE",
      "storeId": "store1",
      "orderStatus": "PAYMENT_COMPLETE",
      "nickname": "이디야화이팅",
      "items": [
        [
          {
            "itemName": "아이스 아메리카노",
            "quantity": 1,
            "espressoShotCount": 1,
            "espressoType": "DECAFFEINATED",
            "cupSize": "VENTI",
            "cupType": "PERSONAL"
          }
        ],
        [
          {
            "itemName": "카페 라떼",
            "quantity": 2,
            "espressoShotCount": 1,
            "espressoType": "DECAFFEINATED",
            "cupSize": "VENTI",
            "cupType": "PERSONAL"
          }
        ]
      ]
    }
  ],
  "hasNext": false,
  "size": 4
}
다음과 같이 사용한다
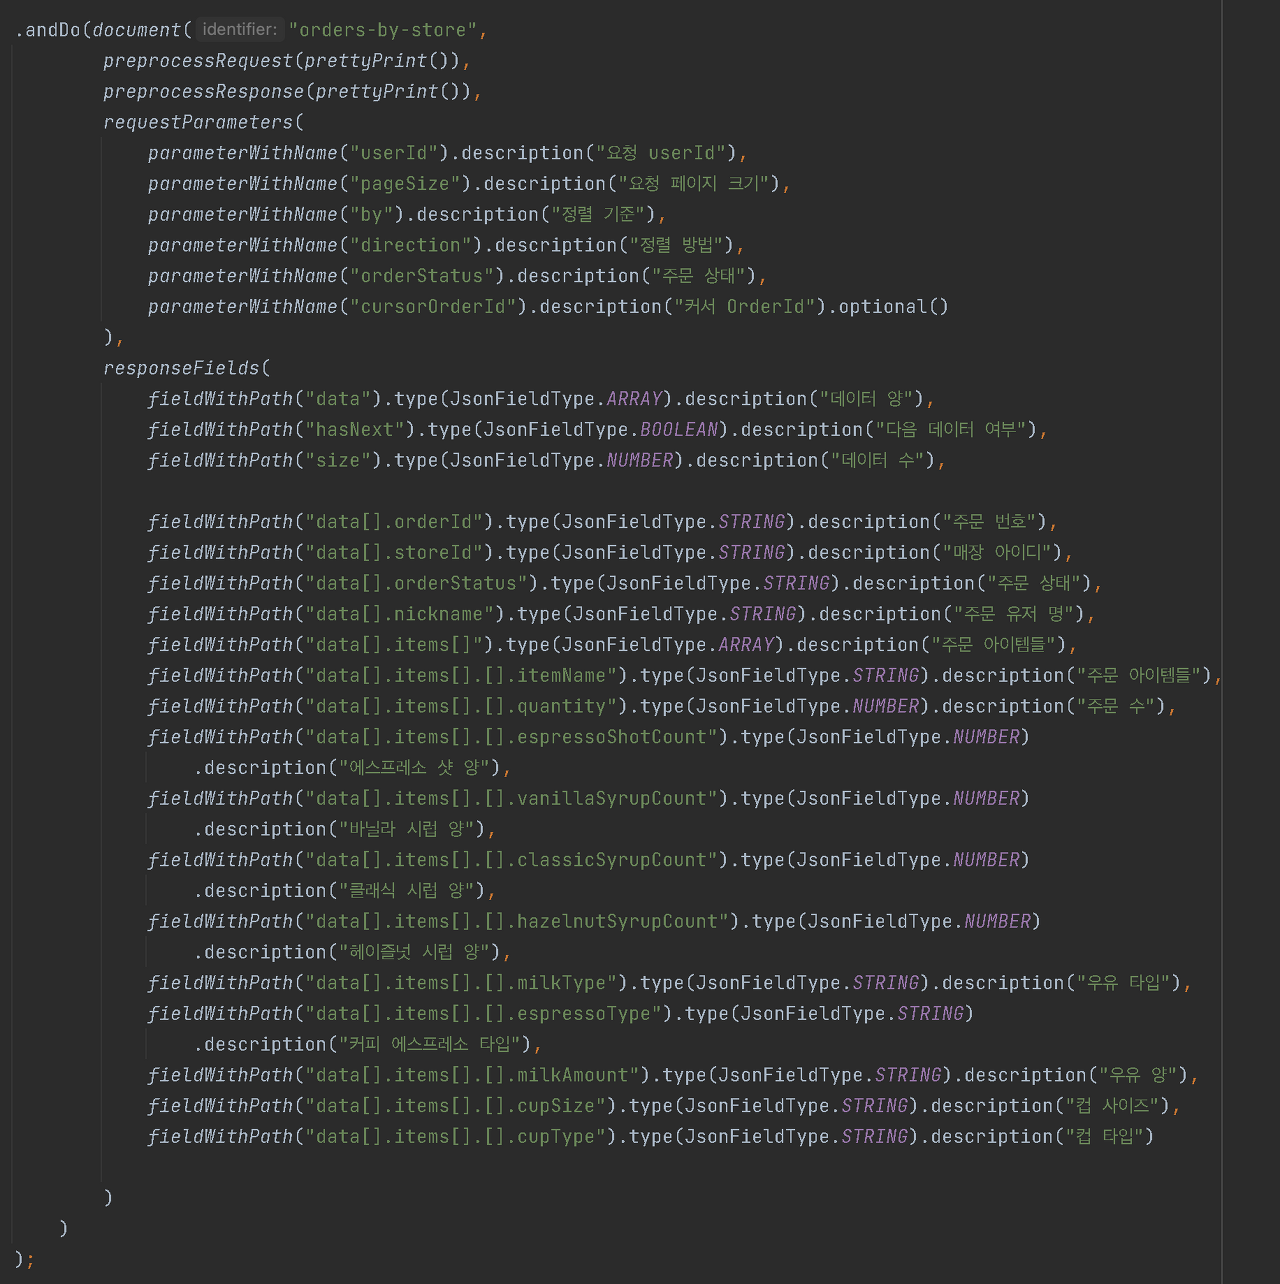
data[].items[].[].필드이름responseFields(
fieldWithPath("data").type(JsonFieldType.ARRAY).description("데이터 양"),
fieldWithPath("hasNext").type(JsonFieldType.BOOLEAN).description("다음 데이터 여부"),
fieldWithPath("size").type(JsonFieldType.NUMBER).description("데이터 수"),
fieldWithPath("data[].orderId").type(JsonFieldType.STRING)
.description("주문 번호"),
fieldWithPath("data[].storeId").type(JsonFieldType.STRING)
.description("매장 아이디"),
fieldWithPath("data[].orderStatus").type(JsonFieldType.STRING)
.description("주문 상태"),
fieldWithPath("data[].nickname").type(JsonFieldType.STRING)
.description("주문 유저 명"),
fieldWithPath("data[].items[]").type(JsonFieldType.ARRAY)
.description("주문 아이템들"),
fieldWithPath("data[].items[].[].itemName").type(JsonFieldType.STRING)
.description("주문 아이템들"),
fieldWithPath("data[].items[].[].quantity").type(JsonFieldType.NUMBER)
.description("주문 수"),
fieldWithPath("data[].items[].[].espressoShotCount").type(JsonFieldType.NUMBER)
.description("에스프레소 샷 양"),
fieldWithPath("data[].items[].[].espressoType").type(JsonFieldType.STRING)
.description("커피 에스프레소 타입"),
fieldWithPath("data[].items[].[].cupSize").type(JsonFieldType.STRING).description("컵 사이즈"),
fieldWithPath("data[].items[].[].cupType").type(JsonFieldType.STRING).description("컵 타입")
)
1depth
만약 배열을 반환하고 있다면 이와 같은 식으로 작성하면 된다.
{
  [
    {
      score: 150
    },
    {
      score: 100
    }
  ]
}fieldWithPath("[].score").type(JsonFieldType.NUMBER).description("score")배열에 이름이 있다면
{
  scoreArray: [
    {
      score: 150
    },
    {
      score: 100
    }
  ]
}fieldWithPath("scoreArray.[].score").type(JsonFieldType.NUMBER).description("score")다른 예시
{
  "a":{
    "b":[
      {
        "c":"one"
      },
      {
        "c":"two"
      },
      {
        "d":"three"
      }
    ],
    "e.dot" : "four"
  }
}
아래 표는 위의 JSON 파일 기준으로 fieldWithPath()에 인자로 전달해야 하는 형식이다.
PathValue
| a | 요소 b 를 포함 |
| a.b | 세가지 요소를 포함하는 배열 |
| ['a']['b'] | 세가지 요소를 포함하는 배열 |
| a['b'] | 세가지 요소를 포함하는 배열 |
| ['a'].b | 세가지 요소를 포함하는 배열 |
| a.b[] | 세가지 요소를 포함하는 배열 |
| a.b[].c | 문자열 one, two를 포함하는 배열 |
| a.b[].d | 문자열 three |
| a['e.dot'] | 문자열 four |
| ['a']['e.dot'] | The string four |
URI 변경
modifyUris를 사용하면 request 및 response에 있는 URI를 변경할 수 있다.
mockMvc.perform(get("/api/v1/data"))
  .andDo(print())
  .andExpect(status().isOk())
  .andDo(document("signup"),
    preprocessRequest(modifyUris()
      .scheme("https")
      .host("www.lannstark.com")
      .removePort(), prettyPrint()),
    preprocessResponse(prettyPrint()));
Host가 바뀌고, port가 더이상 보이지 않는다. 하지만 https가 적용되지는 않고, 실제 SSL 설정이 끝나야 적용될 수도 있을 듯 하다
보다 자세한 내용은 여기를 참고하면 좋다!